How to build the perfect Sand Castle
|
|
How to build the perfect Sand Castle |

|
Along the Shore GATEWAY TO THE JERSEY SHORE VIRTUAL NJ SHORE TOUR CALENDAR OF EVENTS VIRTUAL JERSEY SHORE MALL POINTS OF INTEREST BEACHGUIDE TOP TEN LISTS TIDBITS! S! PARKS ALONG THE SHORE ATTENTION BUSINESS OWNERS! Marketplace RESTAURANTS LODGING REAL ESTATE AND RENTALS Communities Keansburg Sandy Hook Atlantic Highlands Sea Bright Monmouth Beach Long Branch Deal Asbury Park Bradley Beach Avon-by-the-Sea Belmar Spring Lake Sea Girt Manasquan Bay Head Point Pleasant Beach Ocean Grove Mantoloking Lavallette Ortley Beach Seaside Heights Seaside Park Island Beach State Park Barnegat Light Harvey Cedars Surf City Ship Bottom Brant Beach Spray Beach Beach Haven Tuckerton Little Egg Harbor Bayville Absecon Pleasantville Brigantine ATLANTIC CITY! Ventnor City Margate City Somers Point Ocean City Sea Isle City Avalon Stone Harbor Rio Grande The Wildwoods Cape May BACK TO MAIN PAGE |
Leave the cheesy plastic molds behind... and find out what amazing things you can do with wet sand. Here's how nearly everyone can learn how to--
Sandsculpting is the making of a construction in sand. This may be a castle, but the sculpture may also be a composition of other architectural forms, anatomical bodies (humans and animals) and objects. In fact, practically any form can be sculpted in sand. This all seems rather easy, for who hasn�t made a sand castle on the beach in his time ?
To cut a long technical explanation short, the following comparison can apply : If you try to pile a few marbles, you will see that everything falls down. If you use cubes, you will succeed. The same counts for sand. Unlike regular beach sand that has a round grain due to the erosion caused by tides, the sand used for sand sculptures has an angular grain. The round grain makes high constructions impossible. The sand used for the Sand Sculpture Festival Zeebrugge 1997 is special young river sand composed by a company named Smals based in Cuyk, Brabant. They select the young sand on the basis of the size, structure and colour. This sand still has an angular grain suitable for high constructions.
The Technique The first phase is the building phase. The sand is cast into wooden moulds, layer by layer. Every layer is thoroughly wet and tamped down. This compacting is done with petrol 'whackers' or with wooden or steel hand compactors. When the wooden mould is full, another mould is placed on top of it, so that a pyramid is shaped with a bottomless dustbin or a drainpipe filled with sand on top.
Getting Started Using your hands like a front end loader, scoop out a large doublehandful of super wet sand from the bottom of the hole, pulling the sand towards you. Move that sand fast so you don't lose all the water before you get to your destination. Start building your castle on top of the mound of sand you dug from the hole.
A tower is nothing more than a stack of sand patties piled on top of each other.Use smaller handfuls as you gain altitude so that the tower tapers at the top and doesn't get top-heavy and fall over before you get to carve it. Build a Wall Once again, pull a doublehandful of wet sand from the hole. This time, instead of flattening it into a pancake, hold the sides between your flattened hands and jiggle so that the sand takes a brick shape. Keep laying bricks end to end for the desired length of the wall, then lay another layer on top, repeating until you reach the desired height. To form a staircase, first carve the wall into a descending ramp, then cut in individual steps. Building Arches More complex doors can be made with fancy carvings around the edges and arched roofs or collumns on either side. Basically anything you can dream up! Carving the Structures You Have Built
Zandsculptuur Festival |
|
Developed by ?New Jersey MetroNET, Inc. PO Box 155, Parlin, NJ 08859-0155 TEL: 732-316-1095 * FAX: 732-316-1195 E-MAIL: REVISED: June 27, 1999 New Jersey MetroNET, Inc. Policy Statement |
 The Sand Sculpture in Zeebrugge is however a bit bigger than the average castle built by fathers for their children on the beach. The Sand Sand Sculptures can be made of all kinds of sand, but the final height of the sculpture depends on the kind of sand used. For constructions higher than 1 m, a special kind of sand is needed. The size and structure of the grain are of vital importance.
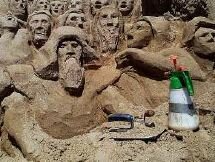 The Tools
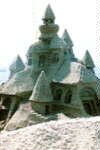 The second phase is the actual shaping of the pile of sand. To carve the sand, the moulds are taken away one by one from top to bottom. The desired shape is than carved in the thus created block of sand and the following mould is taken away. During the carving, the wooden moulds serve as scaffoldings. If you want to learn the sand sculpting technique on a smaller scale, you can also use a bottomless plastic bucket as a mould. You can then make a small block of sand that can be compacted and carved on a table. Or you can use drainpipes of +- 50 cm long to make towers or small erect statues. When working with beach sand, it is advisable to use small moulds. After all, the round structure of the beach sand grain is not suitable for constructions of higher than 1 m. In higher piles, the sand will weigh too much and the pile will fall apart.
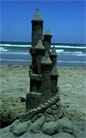 Build a Tower
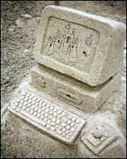 Well we hope that will give you a start! You can practice with a few buckets on a table and get great results. With all these sand secrets (just a little experimentation) you will quickly become an enlightened sand master! So just chant, "top down, thin shaveings...top down, thin shaveings..." As mentioned sand acts like soft stone. So one should always generally carve toward the center if you carve off an edge away from the center you will usually break of (or push off) the edge. It's a very basic rule of stone carveing applied to the physics of sand. Need more instruction? Here are some more How-To Pages: